Pages

Saturday, October 29, 2011

My Bread


I was recently in New York City taking a badly needed and well deserved holiday. I stayed with a friend of mine from high school. When I arrived at his apartment in Brooklyn he had a loaf of the most wonderful home made bread. He has been telling me for a few years now about the no-knead bread method pioneered by Jim Lahey of the Sullivan Street Bakery in Manhattan. Jim's method became wildly popular with food lovers after it appeared in Mark Bittman's column The Minimalist. Jim's method really does allow a home baker to produce a loaf of bread that is every bit as good, if not better, than the artisan bread bakerys here in the Bay Area.

While I was in New York I decided to visit the Sullivan Street Bakery. I tried the Pizza Puttanesca and a half piece of the Artichoke Strecci. I wasn't wild about the puttanesca sauce on the pizza. In my opinion the fishy flavor from the anchovies overpowered the flavors of the bread and was a little too prominent for a sauce that is so liberally applied to the thin crisp crust. The strecci was bliss. Artichoke hearts and garlic baked in an Italian baguette. Perfect!
While I was eating at the bakery I discovered that Jim wrote a book about his no-kneed bread method called "My Bread: The Revolutionary No-Work, No-Knead Method."  I have to say I was a little skeptical about the idea that one could produce a bread that was anything close to what comes out of commercial steam ovens, but baked in a home oven. After tasting my friends bread and the bread baked at the bakery from whence this method came I bought the book.
 

This was my first attempt at baking a yeast bread, save for pizza dough. Jim suggests in his book that you start with the basic recipe before trying some of the more extravagant recipes in his book.

I won't go into great detail on the method as it is pretty well covered by Mark Bittman in his column. The recipe can be found here.
Basically you mix the flour, salt, yeast, and water into a very sticky wet dough. The dough isn't worked or kneaded and looks pretty messy at first. The dough is allowed to rise for 12 to 18 hours during which the gluten in the flour is developed slowly. The long rise also allows naturally occurring bacteria and fermentation to bring much more flavor to this basic bread than found in a quick rise bread.
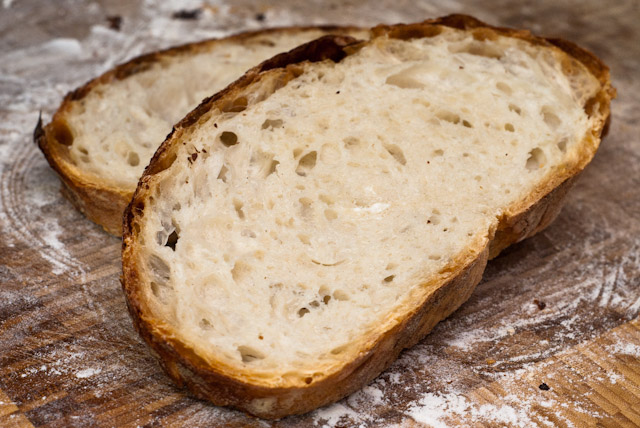
Once the dough has risen it is placed into a heavy pot or dutch oven with a tight fitting lid, preferably made of clay or cast iron. The bread is baked in the pot in a hot oven with the lid on for the first 30 minutes of baking. Since the dough is relatively wet baking it with the lid on mimics a commercial steam oven. After 30 minutes the lid is removed and the bread is allowed to bake for 10-30 minutes longer. This allows the crust of the bread to caramelize and become, well, crusty. If you make this bread do yourself a favor and allow the crust to become really dark, but not burned. It will add a wonderful texture and really add to the flavor of the bread.

I can honestly say that the loaf I made this morning is the best bread I have ever tasted.


Notes
I baked my bread in an oven that was somewhere between 475º F and 500º F. I made a mistake and put the bread in the pot with the seam side down, but I rather like how that turned out, so I may continue to bake the bread this way. I believe that it made the bread rise a little higher at the expense of a wider loaf. I used flour for dusting the dough.

Enjoy!

Coffee Cake

The other day I was given a large bag of very ripe bartlett pears. For a long time I didn't like pears. Mostly because of the pears we got with snack or lunch in elementary school. I have since discovered that not all pears are hard or mealy. This bag of pears was especially good and very ripe. I ate most of them just by themselves, but as they began to get over-ripe I had to find something to make that would use up my remaining stock. I searched my favorite internet sites for recipes featuring pears. My criteria was that the recipe could only call for ingredients I had on hand. I settled on this recipe for Walnut Pear Coffee Cake.


This was my first attempt at baking a cake from scratch and I think the results were spectacular. The one change I made to the original recipe was made out of necessity. I substituted the cup of sour cream in the original recipe with 1 cup plus 1 tablespoon of plain non-fat yogurt. This recipe has made it in to my little black book of recipes calling for the substitution ingredient rather than the original.

Walnut Pear Coffee Cake

Topping:
  • 1 + 1/2 cup chopped walnuts (total 1 1/2 cups but separated)
  •  1/3 cup packed dark brown sugar
  • 1 teaspoon ground cinnamon
  • 1/3 cup all-purpose flour
  • 1/4 cup cold butter, cubed
Filling:
  • 3 medium ripe pears, peeled and sliced
  • 2 teaspoons lemon juice
  • 1/2 cup unsalted butter, softened
  • 1 cup sugar
  • 2 eggs
  • 3/4 teaspoon vanilla extract
  • 1/4 teaspoon almond extract
  • 1 3/4 cups all-purpose flour
  • 3/4 teaspoon baking powder
  • 1/2 teaspoon baking soda
  • 1/4 teaspoon salt
  • 1 cup + 1 tablespoon plain non-fat yoghourt 
Preheat the oven to 350º F

Crumble Topping
In a small bowl combine 1 cup of walnuts, brown sugar, and cinnamon.

In a separate bowl add the flour. Flour your fingers and work the butter into the flour until it becomes a course texture like little pebbles. Most of the flour should be in little clumps. Combine 3/4 cups of the walnut mixture with the flour and butter add the remaining 1/2 cup of walnuts.

Filling
The remaining nut mixture from above is part of the filling (the mixture without the flour and butter).

Toss the pears in the lemon juice. 

Cake Batter
Cream together the 1/2 cup butter and sugar using a stand mixture and the paddle attachment. Add 1 egg at a time and mix until incorporated. Mix in the vanilla and almond extract.

Sift together the flour, baking powder, baking soda, and salt.

Mix 1/3 of the flour with the butter and sugar mixture. Alternate with 1/3 of the yoghourt until all of the flour and yoghourt and butter has been combined. Use as little mixing as possible to combine the ingredients.

Assembly
Pour 1/2 of the cake batter into a greased (with butter) 9 inch spring form pan. Sprinkle with the nut filling (the stuff without butter). Lay the pear slices in an even layer on top of the nut mixture. Pour the remaining cake batter over the pears and spread the crumble topping evenly over the top.

Bake in a 350º F oven for 50 - 60 minutes. When a toothpick is inserted into the middle of the cake it should come out clean.
Remove from the oven and cool the cake on a cooling rack for 10 minutes. Run a knife around the sides of the pan and release the spring form and allow the cake to cool for 1 hour.

Notes
The batter was much thicker than I expected, yet the cake turned out light. The cake rose much more than I expected, so be careful if you use a shallow pan. I actually feel that the cake was best after sitting out for 12 hours. I don't feel like the sour cream would have made this cake much better, so I have elected to reduce the calories and fat in this excellent coffee cake recipe.

Enjoy!


Wednesday, October 26, 2011

First Post

Hi and welcome to The Oakland Skillet. This is the cooking  +more blog of Bradley Hilton. Check back here soon to see what adventures, culinary or otherwise, I get into.